Showing posts with label Summer. Show all posts

Friday, June 15, 2012

Strawberry Mango Smoothie Pops


We absolutely love this simple summer treat.  I like that fact that there are very few ingredients and I can whip them up in just a few minutes.  My kids like the creamy frozen texture on a hot summer day.  Win win!


Ingredients:

Mango Section:
4 cups frozen mango
2 cup vanilla yogurt
1 cup orange juice

Strawberry Section:
4 cups frozen strawberries
2 cup vanilla yogurt
1 cup orange juice


Place frozen mango, yogurt, and juice in a blender.  Mix until combined.  This will be a large batch - I prefer to do it in halves so my blender isn't overloaded.

Pour mixture into small paper cups or popsicle containers - but only fill half full, not to the top.  Now you're going to mix the strawberry section.

Place frozen strawberries, yogurt, and juice in a  blender.  Mix until combined.  Pour into cups over the top of the mango mixture.

Wrap tops of cups with plastic wrap or tin foil and place a popsicle stick in the center.  Place into the freezer until set (about 4 hours or overnight).

These are a big hit at our house.....


Can't you tell....


However, I do have to admit that the mango section is our favorite.  The strawberry is a bit tart.  If you want you can use strawberry yogurt and apple juice in the strawberry combo.  It will sweeten it up a little.


Or you could just make a big batch of the mango and eat that.  We like that too.


Frozen, or in smoothie form, these things are just plain good!  So go out and make some to help keep you cool this summer!

Wednesday, May 9, 2012

Strawberry Cupcakes


I have to admit, I got this recipe from Martha Stewart.  It's the Sprinkles' cupcakes recipe - and boy is it good!  Just try to ignore the copious amounts of butter that are placed in these bad boys.


Cupcake Ingredients:

1/3 cup pureed strawberries
1 1/2 cups all purpose flour, sifted
1 tsp baking powder
1/4 tsp kosher salt
1/4 cup whole milk, room temperature
1 tsp vanilla
1/2 cup unsalted butter, room temperature
1 cup sugar
1 large egg, room temperature
2 large egg whites, room temperature


Start by pureeing your strawberries.  It generally takes about 2/3 cup of strawberries to get 1/3 cup puree.  If there is extra puree, save it for the frosting.


In a medium bowl, whisk together the flour, baking powder and salt.  Set this aside.


In a small bowl, mix together milk, vanilla (I used my clear vanilla from Mexico - I'm really thinking that I should have bought a truckload of this stuff),


and strawberry puree.  Set this aside as well.  Can you see a trend here?  You're going to have a bunch of different bowls, but don't worry, they will all come together soon.


In the bowl of an electric mixer (with a paddle attachment) cream the butter on medium-high speed until it is light and fluffy.  Gradually add the sugar and continue to beat until well combined.

Reduce the mixer speed to medium and slowly add the egg and egg whites until just blended.


With the mixer on low, slowly add half of the flour mixture and mix until just blended.  Then add all of the milk mixture, again, mixing until well blended.

Slowly add the remaining flour mixture and make sure to scrape down the sides of the bowl.  Mix until just blended.


Divide the batter evenly between 12 muffin tins that have been lined with cupcake wrappers.  They should be about 3/4 of the way full.


Bake at 350 degrees for 22 to 25 minutes.  Transfer muffins to a wire rack and allow them to cool.


While those cupcakes are cooling, you might want to make some frosting.  So...here's that recipe.


Frosting Ingredients:

3 Tb strawberry puree
1 cup unsalted butter, firm and slightly cold
pinch of kosher salt
3 1/2 cups powdered sugar, sifted
1/2 tsp vanilla


In a medium bowl, beat together butter and salt (or if you're me, just use salted butter and don't add that pinch - I'm just sayin).

You want this to be light and fluffy.


Reduce mixer speed and slowly add powdered sugar until combined.  Add vanilla (that clear stuff works great and won't darken the color of your frosting) and add the strawberry puree.


Mix until just blended.  Don't over mix or frosting will incorporate too much air.  This should be the consistency of soft ice cream.


 Now that your frosting is done, and your cupcakes are cooled go ahead and frost those things.  I guarantee that you won't be able to keep them from your family for long!

These I frosted with an off-set spatula.            However.....


to frost these, I used a pastry bag with a large star tip at the end.  Either way I'm sure they'll be gone in no time!


Enjoy!

Monday, February 20, 2012

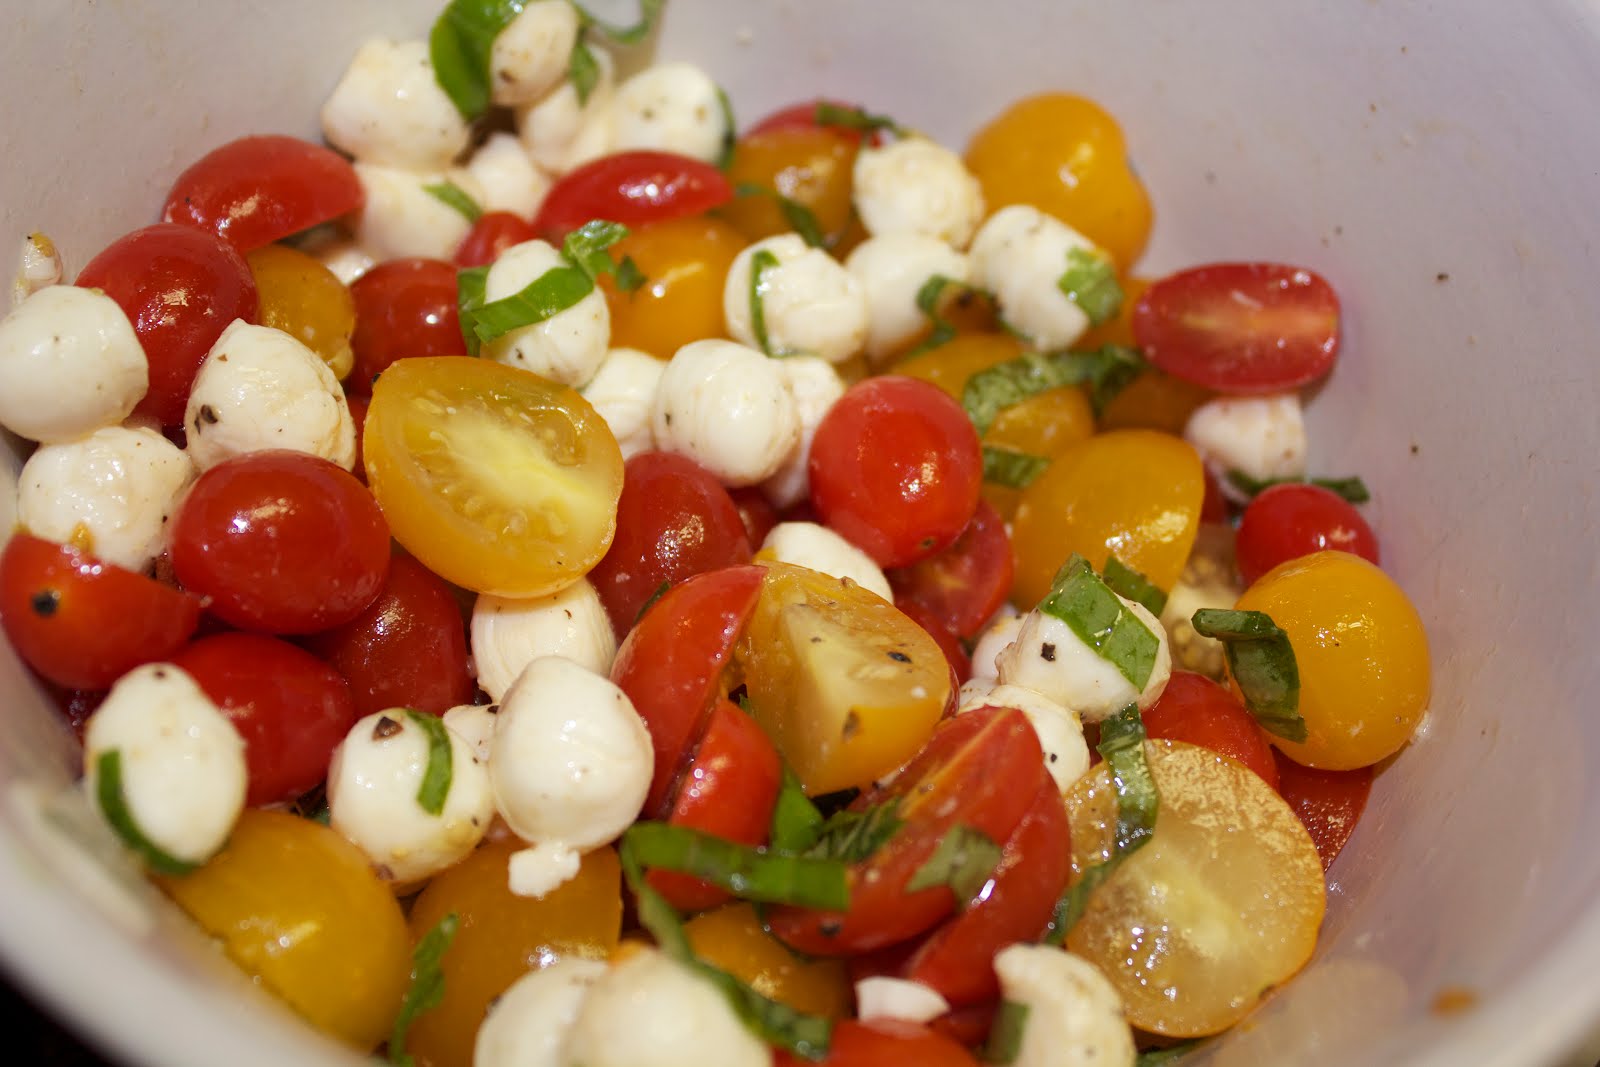
Tomato Basil Salad


This is the type of salad that is simple and yet so elegant. You just add a few ingredients and let them sit for a few minutes so that the flavors can combine. That's it!


Ingredients:

Tomatoes
Fresh Basil
Fresh Mozzarella
Salt
Pepper
Olive Oil

In a bowl, combine tomatoes and mozzarella. I used sweet yellow tomatoes and red grape tomatoes. I also used the small mozzarella balls but you could just as easily cut the mozzarella into small squares.

Julienne the basil and add it to the tomatoes. Sprinkle with salt and pepper; add a drizzle of olive oil and toss to combine.

Let it sit for about 5 minutes and then eat or refrigerate until ready to eat.

Friday, October 7, 2011

Pear Jam


What tastes better than a hot piece of toast smothered in homemade jam? In my opinion, not much!

Fresh pear jam is absolutely amazing, and really simple to make. So, if you haven't ever tried it before, go ahead. You'll be surprised by how much you like Pear Jam and how easy it is to make - you'll never buy jam again.


Ingredients:

4 cups pear puree (about 3 lbs. fully ripe pears)
2 Tbsp. fresh lemon juice
1 box fruit pectin (I like Sure Jell - do not buy the sugar free kind)
5 cups sugar
1/2 tsp. butter
6 jam jars (or 3 pint jars)
6 canning lids
6 canning rings (hold the lids in place - the piece you screw on)


Prepare Jars - There are two ways to do this. The 1st method involves a large pot of boiling water. The 2nd involves the dishwasher....definitely use the 2nd method. Place your jars and rings in the dishwasher - make sure the "heated dry" is on. Add detergent and turn it on. The jars will be sterilized and ready to use when the dishwasher is done.

Prepare Lids - Place new canning lids (ones that fit your jars - wide or small mouthed) in a small pan of water. Place on the stove and bring the water to boiling. Once it starts to boil, reduce the heat to low and let the water simmer. The lids will stay like this until you need them.

Prepare Fruit - Peel and core pears. I like my fruit pureed so I stick it in the blender (or a food processor). If you like yours with more chunks you can use a potato masher or just chop the pears into small pieces. Either way, you need 4 cups of prepared fruit.


Okay....now that everything is ready, here goes.


Place fruit in a large pot. Add the lemon juice and butter. In a small bowl, place 1/2 cup of your sugar and the pectin. Stir to combine. Now add this pectin/sugar mixture to the pears.


Bring to a boil on high heat.

Once it boils - a full rolling boil - add the remaining sugar (4 1/2 cups).


Stir to combine. Return to a full rolling boil and boil for exactly one minute. If your pot is too small, you'll have to really stir this so that it doesn't boil over.


Remove from heat and skim off any foam with a metal spoon. I put this foam into a small bowl and let my kids eat it the next day.

Pull those hot jars and lids out of the dishwasher and get ready to fill them up. I use a 1 cup measure to scoop the jam into a larger 2 cup measure with a handle. Then pour the jam into the hot jars. Fill them up to within 1/8 inch of the top.


Use a clean damp cloth to clean the tops of your jars. You don't want any jam on the top to prevent the lids from sealing.


Remove your lids from the simmering water (I use a butter knife to help pull them out) and place on top of the jars. Now, take the rings and screw them on tight - but not too tight.

Turn your jars over and place on a dish towel. Allow them to stay this way 12 hours or if you're like me and you made your jam at midnight, let them sit overnight.

If you boil your lids and place the jars upside down, there is no need to do a water bath to process the jam. This method is only recommended for jam, so please don't do this with fruits or vegetables.


Now your jam is ready to eat - or place on a shelf until later.

It really is easy to make jam, and it tastes divine. Give it a try...you'll really enjoy it!


Saturday, September 24, 2011

Roasted Summer Vegetables


These vegetables are perfect for the summer - such a beautiful collection of colors. Plus, they're super easy - a lot like the Roasted Potatoes I did a few weeks ago.


Ingredients:

1/2 a yellow pepper
1/2 a red pepper
1/2 a green pepper
2 small zucchini
1 small yellow squash
half an onion - yellow, red, it doesn't matter
1 to 2 Tb. olive oil
2 tsp. garlic powder
salt (usually around 1 1/2 tsp.)
pepper


Seed all the peppers and cut all the vegetables into chunks that are roughly the same size.

Spread all the vegetables on a large cookie sheet and drizzle with olive oil. Use your hands to mix vegetables all around and coat with olive oil. Sprinkle with garlic powder, salt, and pepper.


Place in 400 degree oven and bake for 15 to 20 minutes - depending on the size of your vegetable chunks. Remove from oven when vegetables are tender and transfer to a serving dish. Let them cool a bit and then eat.


Saturday, September 17, 2011

Black Bean & Mango Salsa


I've had this a few times at my friend Emily's home, but I never actually made it until I got some large mangos in my Bountiful Basket.

You can eat this on fish, on chicken, with tortilla chip, or straight out of the bowl with a fork - like I do!


Ingredients:

2 ripe mangos - peeled, pitted, and diced
1 15 oz. can of black beans - drained and rinsed
1/2 cup chopped red onions
1 small green pepper - seeded and chopped
1 small red pepper - seeded and chopped
1/2 cup Italian dressing - any kind
salt and pepper to taste


In a blender or magic bullet, blend 1/4 cup of mango with the Italian dressing until smooth.

In a bowl, combine the rest of the mayo with the beans, onions, and peppers. Add the mango puree and stir.

Season to taste. Chill until ready to serve.

Thursday, August 18, 2011

Tomato & Basil Capellini


I have to say that this dish is amazing. It's light and simple and tastes so good after a hot summer day. I just made a little bit to share with my husband (seeing as how my kids don't like chunks of tomatoes), but I should have made a whole lot more. We ate it within seconds.

Don't take my word for it, go make some....NOW!


Ingredients:

2 Tb. olive oil
1 pint grape tomatoes - washed and cut in half
4 cloves garlic - finely chopped
1 tsp. salt
1 T. fresh basil - julienned (that's chopped in thin slices)
fresh parmesan cheese
12 oz. capellini pasta (angel hair)
mozzarella


Cook pasta according to package directions. A few minutes before you place the pasta in the water, start your sauce.

Heat the oil in a non-stick skillet. Once the oil is hot, add the tomatoes.


Hurry and chop up that garlic and the basil. Add the garlic and half the basil then sprinkle on the salt. Don't forget to put your pasta in the water.

Continue to cook until the tomatoes are heated through and starting to pop open.


When your pasta is done, drain it and then add it to the tomato mixture. Stir to combine and then sprinkle with the remaining basil and a handful of parmesan cheese.

The cheese is really up to you, put on as much as you like. You can also add a little mozzarella if you like. I chose to try and make mine a little more healthy...just a little. : )


Monday, July 18, 2011

Fruit Pizza

This is an easy one - and a crowd pleaser. It's one of our favorite summer desserts.

This recipe is for a pizza stone, so if you decide to make this on a cookie sheet, you may have to increase the ingredient amounts to compensate.


Ingredients:

3/4 of a package sugar cookie dough (I use Pillsbury)
4 oz. cream cheese
1/2 cup powdered sugar
4 oz. whipped topping
lots of different types of fruit - strawberries, blueberries, pineapple, grapes, kiwi, etc.


Lightly dust your cooking stone with flour and roll out the sugar cookie dough to 1/4 to 1/2 inch thickness. Leave 1/2 inch of blank space between the cookie dough and the edge of the pizza stone as the dough will expand when cooked.

Place in the oven and cook according to package directions. Usually about 350 degrees for 12 to 15 minutes.


Remove dough from oven and let cool to room temperature. Meanwhile, mix cream cheese and powdered sugar in a bowl. Once the mixture is combined, fold in the whipped topping.


Spread the cream cheese mixture over the top of the pizza, leaving a 1/4 inch edge of cookie showing. Place fruit on the top in a circular pattern. Continue to add fruit until you get your desired effect.


Put it in the fridge and keep it cool until you're ready to serve. Slice with a pizza cutter and enjoy!

Thursday, July 7, 2011

Bistro Pasta Salad


My kids absolutely love this salad. And the best part is, you can go as simple or as crazy as you want with this. It can be a perfect side dish, or add a little chicken and you have dinner.

I'm going to give you the full recipe, but remember that there are only four absolutely necessary ingredients - the pasta, the cheese, the dressing and the basil. The other stuff is just extra goodness that can enhance the flavors.

Ingredients:

2 cups cooked pasta (penne, or spirals, or bowtie)
1 cup halved grape tomatoes
2 to 4 oz. crumbled feta cheese
1/3 cup lightly packed fresh basil, cut into strips (julienned)
1/4 cup chopped red onions
1/4 cup chopped sun-dried tomatoes
1/2 lb. boneless skinless chicken breasts, grilled, cut into 1/4 inch thick slices
1/2 cup italian dressing (I like the Good Seasons Italian Dressing or the Good Seasons Garlic & Herb)

If you use the Good Seasons dressing, make it according to package instructions.

Combine all ingredients except chicken. Place in refrigerator until chilled.

Top with chicken.


*I chose the simple recipe for my family. Mostly because I was out of red onion and sun dried tomatoes. Remember, it can be as simple or as complex as you like. Also - don't use zesty italian dressing, it just doesn't taste very good...really....don't do it!

Good luck!

Monday, July 4, 2011

Roadside Lemonade


Nothing quenches your thirst on a hot summer day better than a cold glass of homemade lemonade. I absolutely love this recipe. I found it years ago in a magazine..I think. Give it a try, you'll love it!


Ingredients:

1 1/2 cups sugar
1 1/2 cups lemon juice (about 8-9 large lemons)
water
ice cubes

Cut lemons in half and extract juice. Strain, removing seeds and crushed pulp.


In a 3 quart saucepan, combine 2 cups water and the sugar. Bring to a boil. Reduce heat to low, and stirring occasionally, cook until sugar dissolves, 1 to 2 minutes more.


Remove sugar syrup from heat; let cool 5 minutes. Stir lemon juice into sugar syrup.

In a 2 1/2 quart container, combine 4 cups water and the lemon syrup; cover and refrigerate until chilled. When ready to serve lemonade, pour over ice cubes in individual glasses.


Saturday, July 2, 2011

The Steak

Grill Week
Day 6

The Steak


For the final day of Grill Week, I decided to go for the Big Daddy, the king of all barbecues - The Steak!

The first time I ever made a steak for my husband, I put it on the grill, flipped it over, then flipped it over again...and again...and...well, you get the idea. At this point my sweet fiance came running over (that's right, we weren't even married yet) and promptly informed me that you NEVER flip a steak more than once.

And so began our relationship and me NEVER cooking a steak again. Never. I've just watched him do it. And since he cooks them so well, I don't think I will ever cook a steak.

So, really this post will be typed by me, but dictated by my hubby. And he really is the best at cooking steak...so listen up!


Great Grilling Cuts of Meat:

Ribeye (as shown here - the Cowboy Ribeye with the bone in) - fantastic flavor - very tender
Filet - most tender cut of meat, more lean than other cuts
New York Strip - high quality cut - not as much fat as Ribeye so easier to trim
Porterhouse / T-Bone - basically a combo of Filet and New York described above
Sirloin - step down in quality, more affordable - still can be a great steak if done right


Ingredients:

Steaks - cuts of meat described above
Seasonings of your choice (my husband keeps his a secret) - but it could include:
Salt,
Pepper,
Onion Salt
Garlic Salt
Dehydrated Onions
Seasoned Salt

...or just cheat and grab the Montreal Steak Seasoning...


-----

Cooking Instructions

It's important to do two things in preparation for grilling steak:

1. Always grill the steak at room temperature. There is nothing worse than pulling out a frozen steak - or even one out of the cold fridge - and throwing it down on the grill.


2. Season your steak prior to putting it on the grill. I prefer to let it rest a little with the seasonings on both sides.


Now it's time to cook those steaks.

Always preheat your grill. Again you'll want to be using a hot grill - with little flame. Once you place them on the grill you'll want to close the lid and let them work on getting a good sear on the first side. The searing of the meat helps to lock the flavor and juices into the meat.


As you are cooking the steaks, you'll want to take a peek at the bottom to see how quickly they are cooking - and how done the steak is on the first side. Your decision of when to turn the steak will dictate the doneness of the steak. The quicker you turn the steak the closer to 'Rare' it will turn out.


Once you've reached the appropriate cooking time on the first side and turned your steak - work toward having the same level of cooking on the second side. This helps you to have an evenly cooked steak throughout.


Most experienced grillers know that the firmness of the meat when cooked can indicate how done a steak is. As a general rule - the more firm it feels, the closer to 'well done' it is. But also keep in mind that a high quality cut of meat, like a filet or ribeye, won't feel extremely firm until you've completely crispified it.

Once your meat is done, remove it from the grill and let it rest for a few minutes. This will help to finish the cooking process and keep the meat moist, juicy and flavorful.

Now it's time to eat!


LinkWithin

Related Posts Plugin for WordPress, Blogger...