Showing posts with label Grill. Show all posts

Friday, August 12, 2011

Grilled Sea Bass


My parents recently went fishing to Alaska. They brought home over 150 lbs. of fish, and I was lucky enough to be able to bring some home with me. Boy, I planned that trip well!

So, now I'm trying to find different ways to serve fish. This one is a definite keeper. The whole family loved it!

This recipe was intended for a grill, however I didn't want to lose my fish between the grates of our grill so I opted for The George Foreman. I placed the fish on the bottom side of the grill and didn't pull down the lid - basically using it as a grill pan....hmmm....grill pan....maybe I should invest in one of those.


Ingredients:

2 pounds sea bass
1/2 tsp. garlic powder
1/2 tsp. onion powder
1/2 tsp. paprika
2 Tb. butter
2 large cloves garlic, chopped
1 Tb. chopped Italian flat leaf parsley
lemon pepper
kosher salt


Preheat your grill. Chop the garlic and parsley. In a small saucepan over medium heat, melt the butter with the garlic and parsley. Saute for a moment and then remove from the heat.


In a small bowl, stir together the garlic powder, onion powder, and paprika.


Sprinkle seasonings over both sides of the fish. Then add lemon pepper and salt to your liking - we like a lot of lemon pepper around here, so I was generous.

Place fish on lightly oiled grill. Grill fish for 5 to 7 minutes, depending on the thickness of the fish.


Turn the fish and drizzle with butter. Continue cooking for 5 to 7 minutes, or until easily flaked with a fork. Remove when done, and serve imediately.


This was great with the bass, but I'm sure it would also be great on any white fish. I'm really glad I used The Foreman, as my fish was really flaky and would have fallen into my grill had I cooked it outside.

This was absolutely wonderful! You'll love it!

Saturday, July 2, 2011

The Steak

Grill Week
Day 6

The Steak


For the final day of Grill Week, I decided to go for the Big Daddy, the king of all barbecues - The Steak!

The first time I ever made a steak for my husband, I put it on the grill, flipped it over, then flipped it over again...and again...and...well, you get the idea. At this point my sweet fiance came running over (that's right, we weren't even married yet) and promptly informed me that you NEVER flip a steak more than once.

And so began our relationship and me NEVER cooking a steak again. Never. I've just watched him do it. And since he cooks them so well, I don't think I will ever cook a steak.

So, really this post will be typed by me, but dictated by my hubby. And he really is the best at cooking steak...so listen up!


Great Grilling Cuts of Meat:

Ribeye (as shown here - the Cowboy Ribeye with the bone in) - fantastic flavor - very tender
Filet - most tender cut of meat, more lean than other cuts
New York Strip - high quality cut - not as much fat as Ribeye so easier to trim
Porterhouse / T-Bone - basically a combo of Filet and New York described above
Sirloin - step down in quality, more affordable - still can be a great steak if done right


Ingredients:

Steaks - cuts of meat described above
Seasonings of your choice (my husband keeps his a secret) - but it could include:
Salt,
Pepper,
Onion Salt
Garlic Salt
Dehydrated Onions
Seasoned Salt

...or just cheat and grab the Montreal Steak Seasoning...


-----

Cooking Instructions

It's important to do two things in preparation for grilling steak:

1. Always grill the steak at room temperature. There is nothing worse than pulling out a frozen steak - or even one out of the cold fridge - and throwing it down on the grill.


2. Season your steak prior to putting it on the grill. I prefer to let it rest a little with the seasonings on both sides.


Now it's time to cook those steaks.

Always preheat your grill. Again you'll want to be using a hot grill - with little flame. Once you place them on the grill you'll want to close the lid and let them work on getting a good sear on the first side. The searing of the meat helps to lock the flavor and juices into the meat.


As you are cooking the steaks, you'll want to take a peek at the bottom to see how quickly they are cooking - and how done the steak is on the first side. Your decision of when to turn the steak will dictate the doneness of the steak. The quicker you turn the steak the closer to 'Rare' it will turn out.


Once you've reached the appropriate cooking time on the first side and turned your steak - work toward having the same level of cooking on the second side. This helps you to have an evenly cooked steak throughout.


Most experienced grillers know that the firmness of the meat when cooked can indicate how done a steak is. As a general rule - the more firm it feels, the closer to 'well done' it is. But also keep in mind that a high quality cut of meat, like a filet or ribeye, won't feel extremely firm until you've completely crispified it.

Once your meat is done, remove it from the grill and let it rest for a few minutes. This will help to finish the cooking process and keep the meat moist, juicy and flavorful.

Now it's time to eat!


Friday, July 1, 2011

Pageant Turkey

Grill Week
Day 5

Pageant Turkey


I am from a small town in central Utah. Every year this town has a huge pageant telling the story of how our valley was settled and what brought the people there.

Along with the pageant, there is a dinner that people can purchase. As fas as I know, this dinner has always been the same thing - Pageant Turkey!

So today, you are getting the secret community recipe (well, not really secret) and believe me, you will love it!

I did realize that unless you live in a small community with a turkey plant in your midst, you probably will not be able to find turkey breasts. So, for this recipe I just used chicken.

Give it a try - you won't be disappointed.

Ingredients:

1 cup oil
1 cup soy sauce
3/4 tsp garlic powder
1/2 tsp horseradish sauce (optional)
2 cups Sprite
5 lbs turkey breast - cut into long strips about 1-1/2 inches wide

Mix all first 5 ingredients together to make a marinade. Place the turkey in the marinade and cover. Refrigerate overnight.


Preheat your grill for 10 minutes. Turn the heat down to medium/low and place turkey on the grill perpendicular to your grate. This will give you the nice grill lines on your turkey.


Cover and cook until the turkey is seared on the bottom and starting to cook up the sides.

Once it has cooked about 1/4 to 1/2 way up the side, flip the turkey.


Continue to cook until the turkey is done. It will feel firm to the touch - not soft (about 165 degrees if you want to do it that way). Hopefully, after you've cooked a few times, you'll be able to know when it's done by the way it feels.

Remove that turkey and put it on a plate - it's time to eat!


Thursday, June 30, 2011

All American Burger

Grill Week
Day 4

All American Burger


Have you ever gone to a barbecue and the burgers are processed frozen meat that's been thrown on the grill with absolutely no seasonings? Yeah...me too. And I have to say, it is one of my least favorite things to eat.

I mean...come on! A great hamburger is really not that difficult to make. If you feel at all intimidated, just keep reading and you'll realize that it really isn't that hard. And who knows, maybe you'll be tempted to make a great burger at your next barbecue.


Ingredients:

2 lbs ground beef
2 tsp garlic salt
1 Tb Montreal Steak Seasoning
1/4 cup chopped dehydrated onions (you can use chopped real onions, but make sure they're chopped really well - use 1/2 cup)


Place all the ingredients in a bowl. Mix with your hands to combine. Don't over mix or it will make the meat tough.


Once all the ingredients have been combined, divide the mixture into 6 to 8 equal parts. We did four huge burgers and 3 small burgers. You could get 8 regular sized ones as well - you choose the combo that works for you.

Take one of your sections and roll into a ball, pressing the edges in with your right hand while flattening the ball with your left palm.


Once the edges are nice and tight, flatten the burger even further with your left palm and right fingers.


Place the burger on a plate that has been covered with a sheet of wax or parchment paper. Continue to stack the completed burgers with a sheet of wax paper between each one. This will make it a lot easier to transfer them to the grill.

At this point you can throw those burgers back in the fridge (once they're covered in saran wrap). Or you can use them immediately - which is what we're going to do.


Preheat your grill. Turn that baby on high and give it about 10 minutes to heat up.

This is the point where I hand the plate of burgers over to my husband and head back into the house for a nice cold glass of water. But, since the purpose of this blog is to teach you how to barbecue, I guess I'll have to go ask him what you do next.

Once your grill is ready, turn the flame down to medium/low. Place the burgers on the grill and close the lid. You want to make sure that they get a nice sear on the bottom. When grilling beef you want to only turn it once. The more you flip your meat, the drier it will become. So, keep an eye on those burgers.

When the sides (not middle) of the burger look cooked, put your spatula underneath and lift slightly. The bottom should be seared - not burnt. If this is the case, flip that thing. If not, give it a few more minutes. If it's burnt, feed it to the dog.


After you've flipped that burger, you now want to test doneness by feel. A burger that is done will be firm but not hard. It should not be jiggly or squishy.

*Side note*
I'm being told by my husband that some people like their burgers medium - who are you people?! But, if you're out there, the trick to getting that pink center is to flip your burger before the sides look done. Don't let the side turn entirely brown. After you've flipped it, sear the next side and feel for firmness.

No matter how you like your burger, at some point they will be done - and hopefully not burnt or hard.


At this point, toast those hamburger buns if you want to and then transfer buns and burgers to a plate.

This is what I was inside working on while my hubby was cooking burgers.


Now comes the fun part. Take that burger and load it up.


We're building an All American today, so this is what we used:

Mayo - Hellmans is the best
Slices of cheese - the real stuff
Tomatoes
Lettuce
Pickles
Red Onion
Ketchup
Mustard


The nice thing about hamburgers is that you can add pretty much whatever you want - avocados, bacon, ranch dressing, barbecue sauce, ANYTHING. Really the sky's the limit.

Now you don't have any excuse. Go out and make yourself a burger.

Enjoy!

Wednesday, June 29, 2011

Grilled Corn on the Cob

Grill Week
Day 3


Grilled Corn on the Cob

This was a fun one. Easy and very few ingredients - my kind of cooking.

Ingredients:
Corn on the Cob
Water
Grill

Take your corn, still in the husks, and trim off anything that can burn. This includes the extra corn silk on the ends, the fly-aways on the sides, and even those long handles on the bottom.


Once they're all trimmed up, soak the ears of corn for 15 minutes in water. This will help prevent burning as well as help steam the corn during cooking.

This is also a good time to preheat that grill - set it on high, close the lid, and let it get hot.

Remove corn from water and pat dry. Turn the flames down to low and place the corn on the hot grill. Placement will be similar to kabobs - perpendicular to the grill so you can rotate them left to right.


Close the lid and let those things cook. Check them every 3 to 5 minutes and rotate to ensure equal cooking on each side.

The whole cooking process will take 15 to 20 minutes.


The corn is done when the husk looks wilted and dry. It will be a slightly faded, almost gray, color - but not burnt (remember that low flame).


Place the corn on a platter and take inside. Now you have to remove the husks - but be careful, they are very hot.

Once the husks are removed, you're ready to eat! You can use butter, salt, pepper, etc.

I decided to make a little herbed butter for our corn (recipe below).


Herbed Butter


Ingredients:

1/2 cube butter - softened
1 tsp garlic powder
1/2 tsp thyme
1/2 tsp parsley


Mix together all the ingredients. Place on a sheet of saran wrap and lightly fold the saran wrap around the butter to form a log. Place in the fridge until it hardens.

Remove from fridge, place on a plate and roll your corn in the herbed butter.


Tuesday, June 28, 2011

Grilled Pizza

Grill Week
Day 2


Grilled Pizza


Making Pizza on a grill was something new for our family, but I have to say we really enjoyed it. The kids had a great time "decorating" their pizzas and Grandma was even here to help us out. I highly recommend trying this!

There are three components to this recipe: the dough, the pizza sauce, and the toppings. I chose to make my dough and sauce from scratch. However, if you would rather, you can purchase the "just add water" dough mix and the bottled pizza sauce. Your choice.

This post will be divided into three sections to help keep thing clear and concise.


The Pizza Sauce


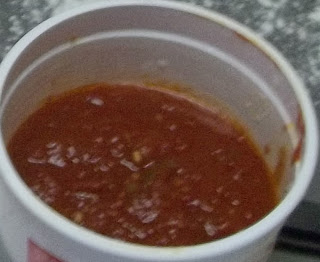
I start this post with the sauce first, since it needs to be prepared in advance. You could make it while your dough is rising...but if you're like me, you would be stressed trying to fit it all in. I just made mine in the morning and stuck it in the fridge...hence the not so great picture and the ugly container. Sorry.


Ingredients:
1/8 cup olive oil
1/2 tsp kosher salt
3 cloves garlic, finely chopped
1 28-ounce can crushed red tomatoes
1/4 cup chopped fresh basil

Put the oil into a sauce pan. Saute the garlic for 30 seconds on medium to high heat. Then add the remaining ingredients. Simmer on low for 15 minutes.


The Dough

Ingredients:
1 1/2 cups warm water (110 to 115 degrees)
2 Tb yeast
1 tsp sugar
3 1/2 cups flour
1/2 tsp salt
1 Tb oil


Mix together the water, sugar and yeast. Once the yeast is foaming (approximately 5 minutes) add 3 cups of flour, the salt and the oil. Mix on low speed until a soft dough forms and the sides of the bowl come clean. Add additional flour if needed.

Place dough in a greased bowl and allow it to rise until double in size - about 1 hour.


Before you go any further - go turn on that grill. You want to heat it up.


Remove dough and cut into 6 equal pieces (or 8 if you want smaller pizzas). Stretch and form dough into a circle (or oblong, or square, or any shape your little helpers can make).


Place the dough on a floured cookie sheet, and then take them out to the grill - we grilled three pizza crusts at a time.


You want your grill to be nice and hot, but you don't want the flames to burn your pizza. The best option is to leave half of your grill on high and the other half on low. Place the pizza crusts on the low side of the grill.

The easiest way to get the pizza off is by using a spatula - believe me, I tried other things as well. A spatula is your best bet!

Once your pizza crusts are on the grill, cover that baby and let them cook for 5 to 7 minutes. Check them occasionally, but remember that every time you open the lid you loose heat and your grill is acting as your oven.


Once the bottom side of your crust is done, take it out and flip it over on to a cookie sheet. You will be putting your toppings on the side you just cooked.


Now on to the good stuff.....


The Toppings

You can use whatever you want. These are just some of the things we like in our family.


Ingredients:
Sauteed Onions and Peppers
Pepperoni Slices
Ham Chunks
Spinach
Shredded Mozzarella Cheese (Part Skim)
Whole Milk Mozzarella (sliced)


Start by placing some pizza sauce on each crust - not too much or it will be soggy. Then add all the other good stuff.

We did discover that the whole milk mozzarella melted a lot better - and tasted better- than the part skim kind.

Once your pizzas are decorated, take them back out to the grill. Again, put them on the low side and close that lid.


They need to cook for 5 to 7 more minutes (I think ours took 10 - perhaps I was checking them too often).


Once they're done, pull them out and get ready to eat!


Here are some of our crazy concoctions:


Pepperoni & Mozzarella


Peppers, Onions & Spinach with Mozzarella


Ham & Mozzarella


Monday, June 27, 2011

Teriyaki Chicken Kabobs

Grill Week
Day 1


Teriyaki Chicken Kabobs

I posted about this recipe a while back. I had tried to make these, only to discover that I was completely out of skewers. Well, this time I was prepared!

I got this recipe from my mother-in-law, and I have to say that I have never tasted kabobs that are quite this juicy and tender - absolutely amazing!

See all of those kabobs pictured above? Yeah...my family of 6 ate every...single...one. We didn't have any leftovers - they're that good!

Ingredients:

Marinade
1/2 cup soy sauce
1/4 cup sugar
1 clove garlic
1 Tb. oil
1 tsp. ginger

2 to 3 large chicken breasts - cut in 1 to 1 1/2 inch chunks


Vegetables
2 small zucchini cut into 1 inch chunks
1 onion - chunked
1 red pepper - chunked
1 can diced pineapple
salt and pepper
wooden skewers


Combine marinade ingredients into a 9x13 pan.


Place chicken in pan, cover with plastic wrap, and allow to marinate 4 hours or overnight. Turn the chicken over half-way through the marinading process.


Soak the wooden skewers in water for 30 minutes (this will help keep them from burning during the cooking process). While they're soaking, go turn on that grill - we want it to be nice and hot.

Lightly sprinkle the vegetables with salt and pepper, then remove the skewers from the water and begin assembling the kabobs.

Randomly place chicken, vegetables, and pineapple on the skewers. I like to cap the ends of the skewers with vegetables, as well as place lots of pineapple by the chicken. But, that's just me.


Once they are assembled, take them out to the grill. By now your grill rack and the interior of the grill should be at high heat.

This is the point where I turn it over to my husband. I prepare the food and he grills it - that's just how our relationship works. So...my husband, Elliott, will take over the post from here.


Just before placing the kabobs on the grill - turn the grill down to Low. There should be very few flames so the kabobs don't char.

Depending on the speed of cooking - you'll want to use little to no flame during the cooking process. Remember - the more flame you have - the more charring you'll end up with on your kabobs. If you need to have a flame, use an indirect heat - for example keep the far left burner on high but have your kabobs on the right side of the grill.

I like to put the kabobs perpendicular to the front of the grill - allowing you to turn them to the right or left, instead of turning them from front to back of the grill. This will also keep you from burning your hand reaching inside the grill to grab any kabobs at the back. Tongs are the easiest way to work with kabobs.

Keep the grill lid closed as much as possible to keep the heat in - but check them periodically to ensure they aren't burning. With chicken and kabobs, you'll end up turning them more often than other grilling meats.

Cook them until the chicken is firm to the touch - and done on the inside (temp should be 165 on the inside). The more often you grill - the better you'll be at gauging the doneness by feel.

Since the chicken chunks aren't very thick, and you'll be turning them to cook on all sides, the whole cooking process won't be very long - 10-15 minutes or less.

When the kabobs are done, remove them from the grill and place them on a clean plate (not the one you brought them to the grill on) and take them in to be devoured. There is no need to let them rest like other meats - so at this point it's time to EAT!


A Big Thanks to my hubby for helping me out this week. Be sure to check back tomorrow to see what we're grilling!

LinkWithin

Related Posts Plugin for WordPress, Blogger...